DFA Appointment System | Schedule an DFA Passport Appointment
The Department of Foreign Affairs DFA Appointment system can be daunting. Whether you’re renewing your passport, applying for a new one, or have other consular needs, securing an appointment is a crucial first step.
This comprehensive guide provides essential tips and tricks to book your DFA appointment efficiently. This ensures a smooth and successful visit to the DFA office.

DFA Appointment www.passport.gov.ph Appointment
Navigating the intricacies of securing a DFA appointment through the Philippines’ passport application system is a crucial step for citizens seeking to travel abroad or renew their travel documents.
DFA appointment Philippines
The Department of Foreign Affairs (DFA) appointment system, available via their official website at www.passport.gov.ph, serves as the gateway to accessing essential consular services. Understanding this process ensures individuals can efficiently schedule appointments, manage their documents, and embark on their international journeys with confidence and ease.
Important Note:
The Consular Section is open Monday through Friday from 10 am to 4 pm. There is no Embassy service on Saturdays or Sundays, nor on Philippine and Spanish holidays.
Requirements for a Philippine Passport DFA Appointment
While waiting for your DFA appointment, prepare all necessary IDs and documents. Requirements vary based on applicant status first-time, renewal, minor, or name change.
For Adult New Applicants
- Confirmed online appointment
- Completed application form
- PSA Birth Certificate (original + photocopy)
- Married women using spouse’s surname: PSA or LCR Marriage Certificate
- Using maiden name: No marriage certificate needed
- Widowed/annulled/divorced: Additional documents (e.g., PSA Death Certificate, annulment papers)
For Adult Passport Renewal
- All above documents
- Current passport (original + photocopy of data page)
- For name changes:
- PSA Marriage Certificate
- Annotated marriage or court documents (for annulment, divorce)
- PSA Death Certificate (if widowed)
For Minor Applicants
- Confirmed online appointment
- Completed application form
- PSA Birth Certificate (or LCR copy)
- Personal appearance of the child and one parent/authorized adult
- Valid ID of the minor and adult companion
- Additional supporting documents may be required based on the child’s circumstances
List of Acceptable IDs for Philippine Passport DFA Appointment
- Social Security System (SSS) Card
- Government Service Insurance System (GSIS) Card
- Unified Multi-Purpose ID (UMID)
- LTO Driver’s License (Student Permit accepted if card format)
- BLTO Driver’s License (issued 2022 onwards)
- PRC ID
- OWWA E-Card
- COMELEC Voter’s ID or Certificate (from COMELEC main office)
- PNP Permit to Carry Firearms Outside Residence
- Senior Citizen ID
- Airman License (issued August 2016 onwards)
- Philippine Postal ID
- Seafarer’s Record Book (SRB) or SID (issued Feb 2020 onwards by MARINA)
- Valid/Latest Passport (for renewal)
- School ID
- Minors: If not available, Certificate of Enrollment with photo and school’s dry seal
- Adults: School ID and Registration Certificate
Note:
Overseas applicants may present host government-issued IDs showing Philippine citizenship (e.g., Residence Card).
All IDs must be readable, untampered, and have consistent information with submitted documents.
Rules for DFA Appointment
- One appointment per person
- No double bookings
- Bring all documents
- Arrive early (but not too early—30 minutes is enough)
- Dress appropriately (no sleeveless shirts, shorts, or slippers)
- No companions unless required (minors, seniors, PWDs)
DFA Appointment Book Online
DFA Appointment booking process is very simple, please follow these steps.
- Step 1: Visit the “Official Website of DFA”.
- Step 2: Click on the above “Button“.
- Step 3: Move to the “Official Website“.
- Step 4: Enter the provided Detail.
- Step 5: Book a DFA Appointment Online.
DFA Appointment Book Online Through Official Website
Follow these steps to book your DFA Appointment:
Step 1: Visit the “DFA” official website.
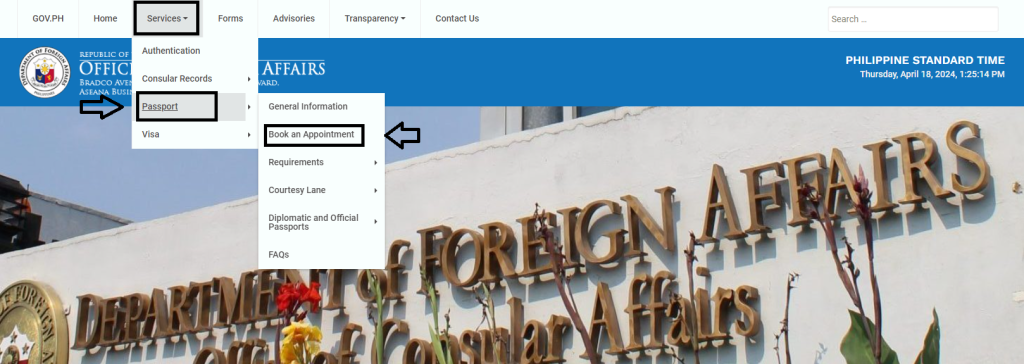
Step 2: Go to the “Service” and “Passport” tab. Then click on “Book an Appointment”.
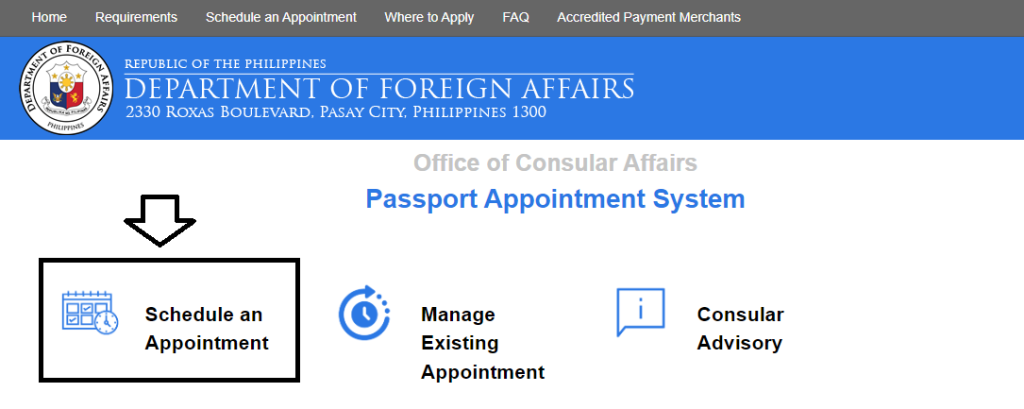
Step 3: Click on the “Schedule an Appointment”.
Step 4: Accept “Terms and Conditions” and click “Start Individual Appointment”.
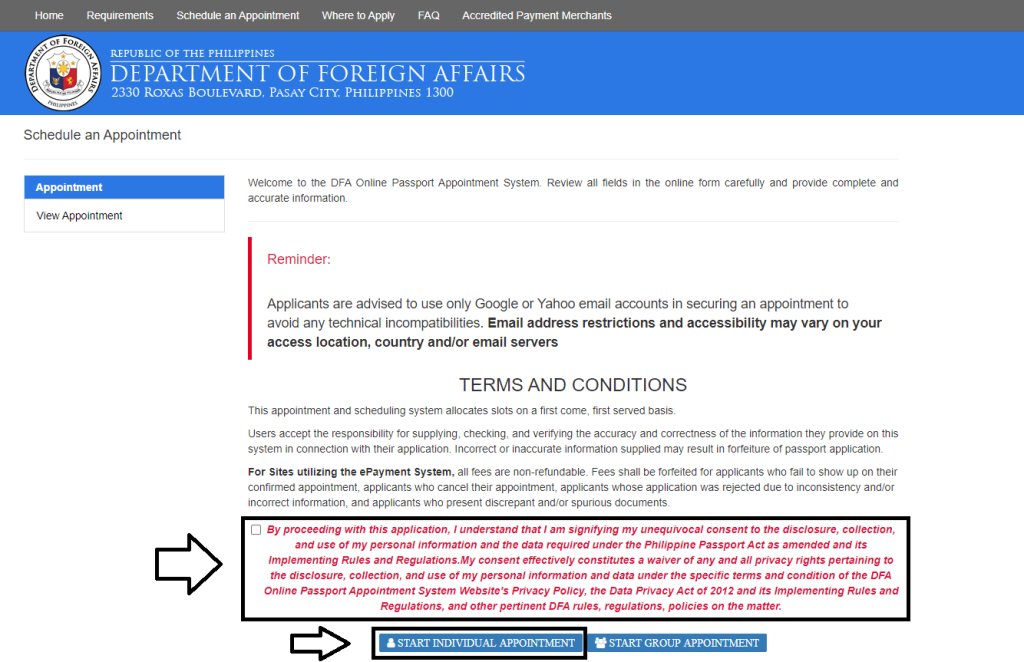
Step 5: Enter the “Site Location” detail.
- Please select a “Region”.
- Please select a “Country”.
- Please select a “Site”.
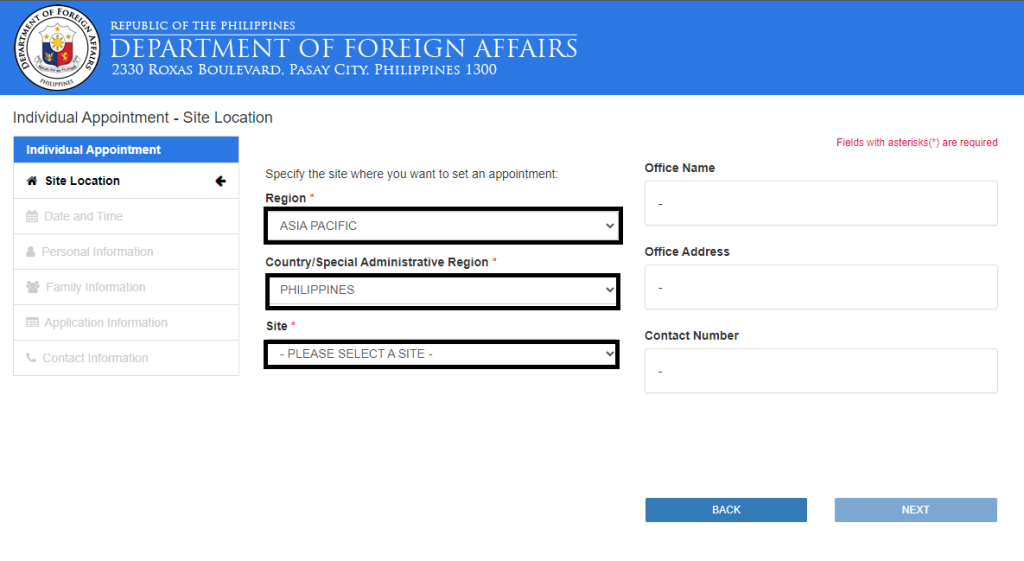
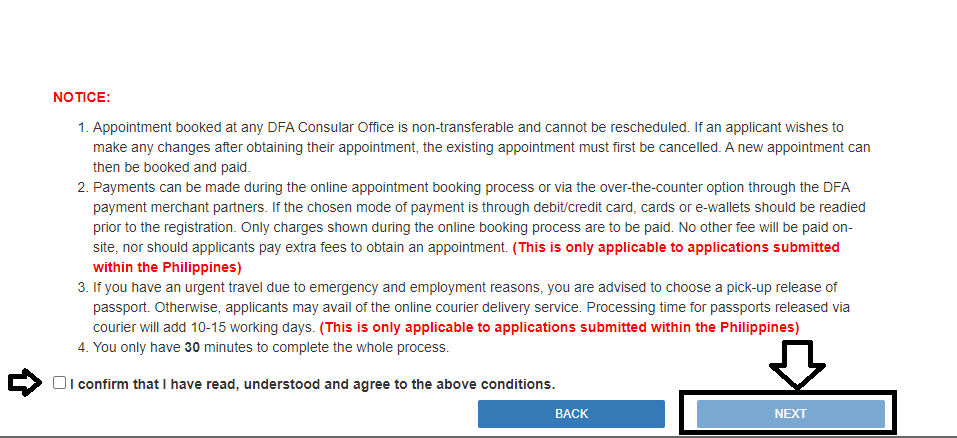
- Understood and agree to the above “Condition”.
- Click on the “Next” button.
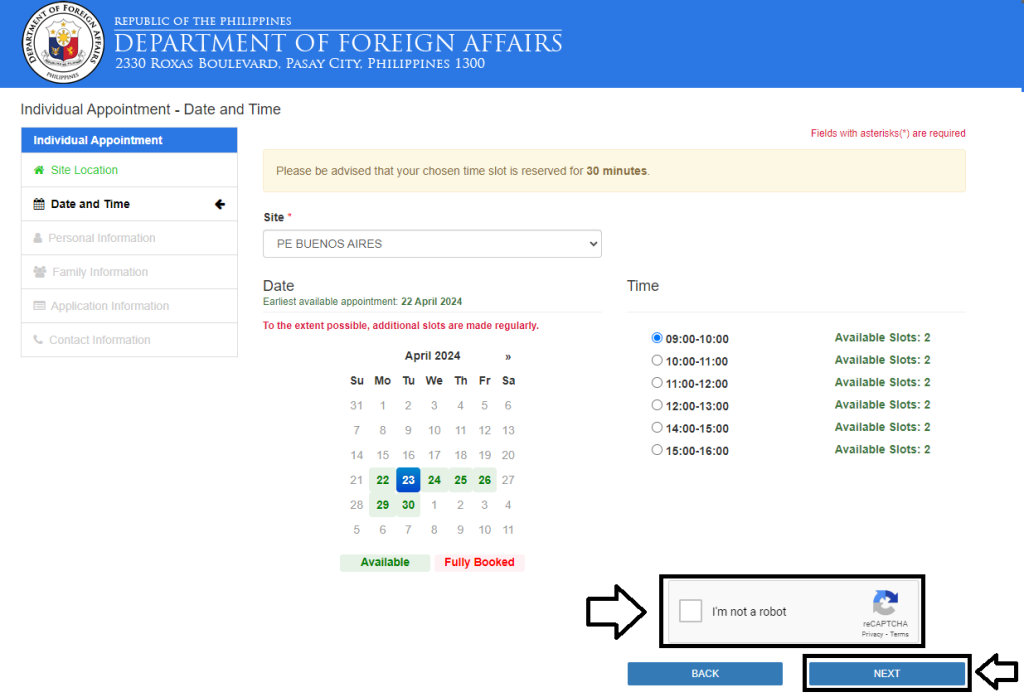
Step 6: Select the “Date and Time”.
- Choose from the available dates and times. Early morning appointments often mean shorter lines. The green color date is available to book appointments, while the red color date is unavailable.
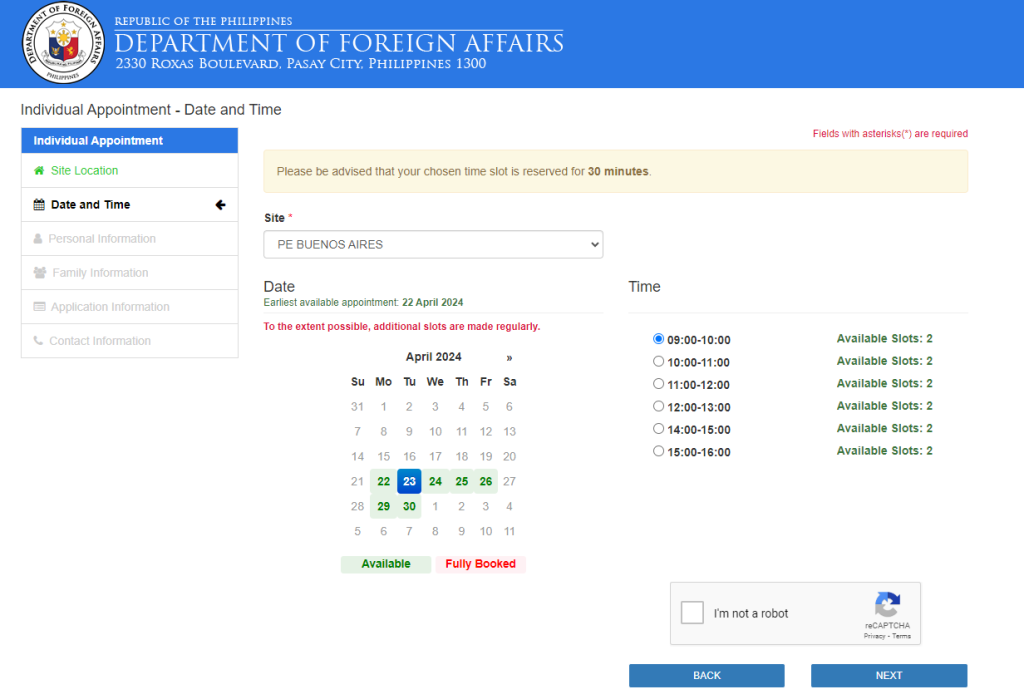
- Verify “I’m not a robot”.
- Click on the “Next” button.
Step 7: Enter your “Personal Information”.
- Click on “I agree/Malinaw sa akin”.

- Enter your “Phone Number” and “Mobile Number”.
- Enter your “Email Address” and confirm your “Email Address”.
- Enter your “Last Name,” “Given Name” and “Middle Name”.
- Select your “Date of Birth” and “Gender”.
- Select your “Civil Status” and “Birth Legitimacy”.
- Select your “Country of Birth,” “Province” and “City”.
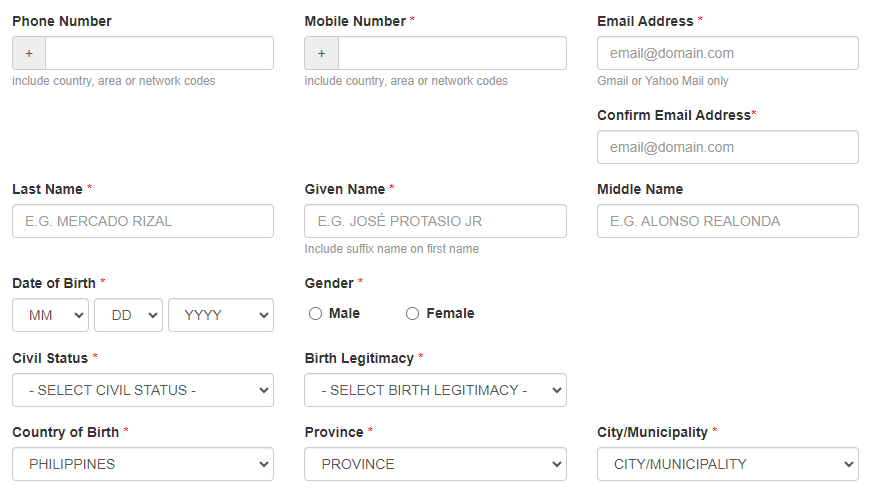
- Click on the “Next” button.
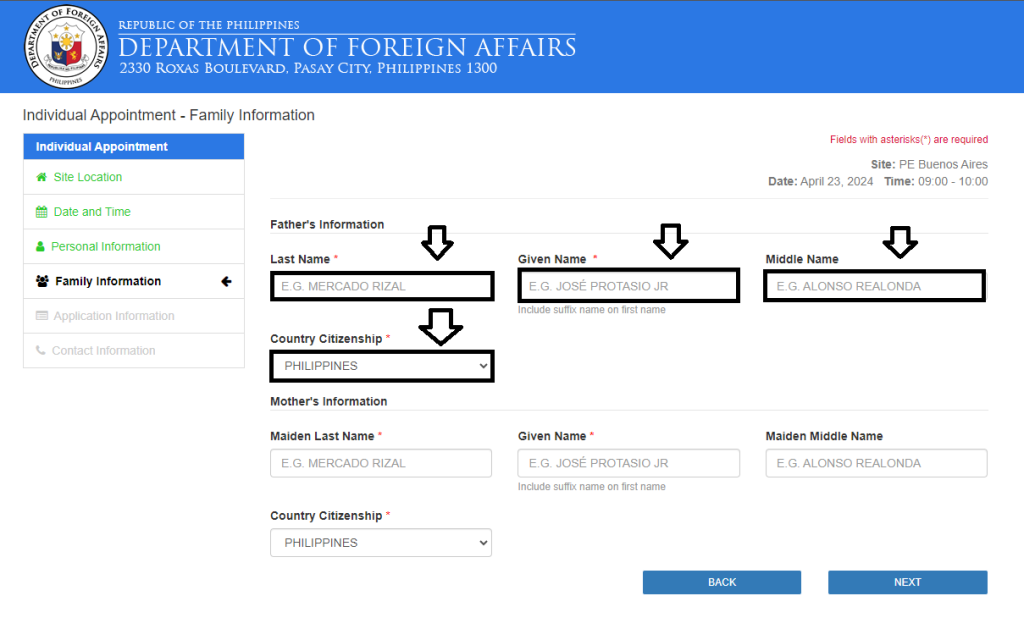
Step 8: Enter your “Family Information”.
Father Information
- Enter the “Last Name,” “Given Name” and “Middle Name”.
- Select the “Country Citizenship”.
Mother Information
- Enter the “Last Name,” “Given Name” and “Middle Name”.
- Select the “Country Citizenship
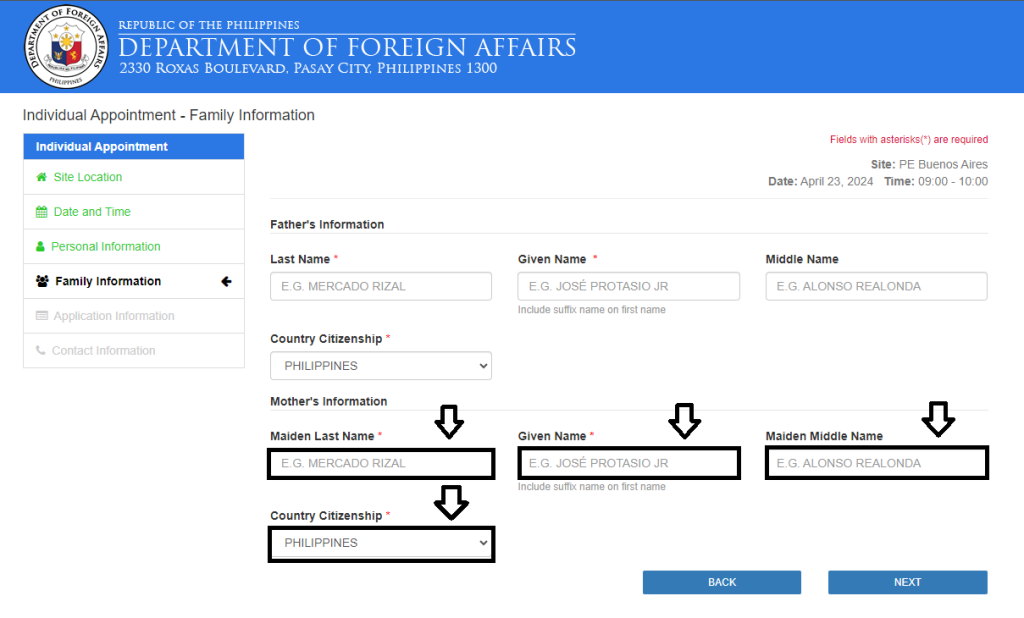
- Click on the “Next” button.

Step 9: Enter your “Application Information”.
- Select application type “New“
- Select “Basis of Philippine Citizenship”.
- Select “Foreign Passport Holder”.
- Enter your “Emergency Contact Person” number and “Contact Number”.
- Click on the “Next” Button.

Step 10: Enter your “Contact Information” Information.
- Enter your “Current Address”.
- Enter your “City” and “Country”
- Enter your “Occupation” and “Office Number”.
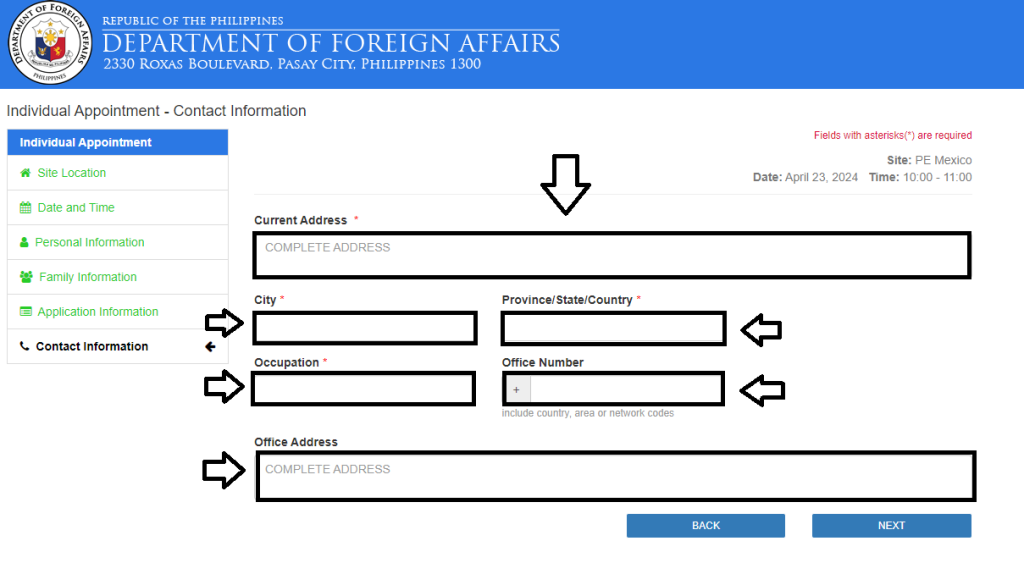
- Enter your “Office Address” and click on the “Next” button.
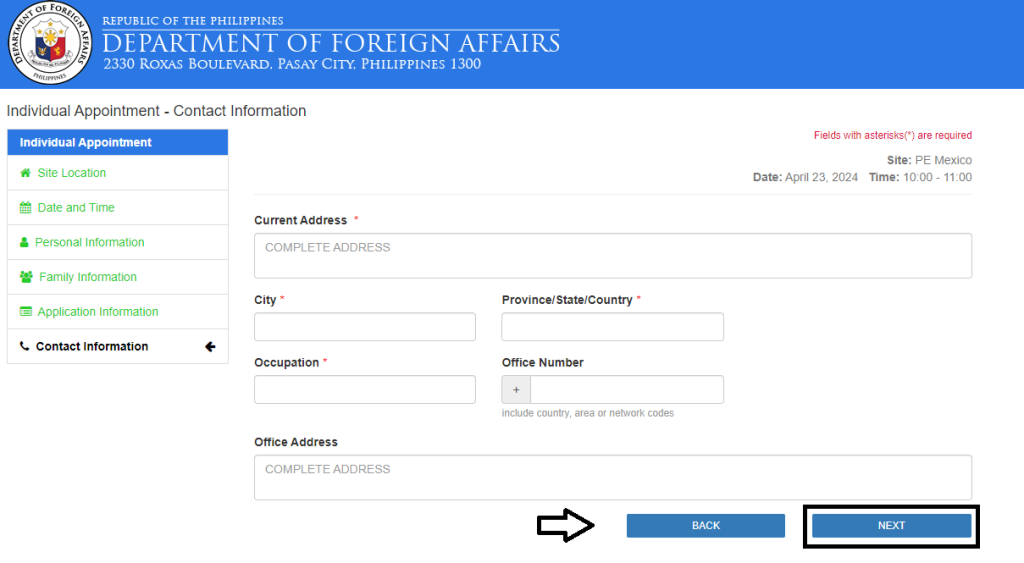
Step 11: Confirm your “Personal Information”. Verify “I’m not a robot“. Accept “Terms and Conditions” and click on the “Confirm” button.

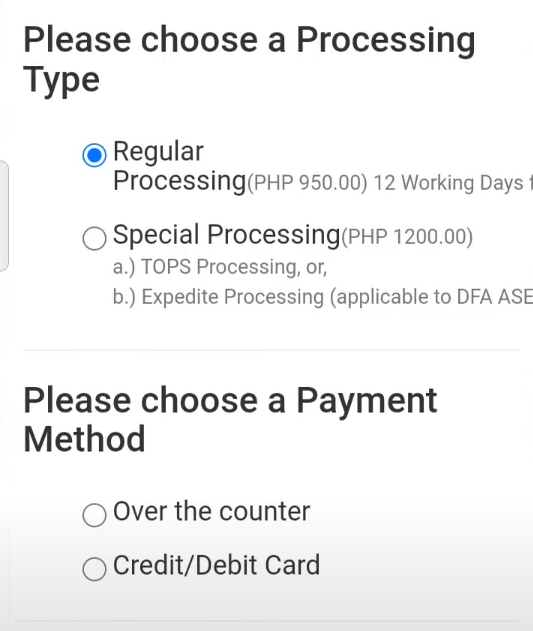
Step 12: Please choose a “Processing” type.
Step 13: Please choose a “Payment” method.
DFA Passport Appointment (TUTORIAL)
What is the DFA Appointment?
A DFA appointment is a scheduled slot obtained through the Department of Foreign Affairs in the Philippines for consular services like passport applications and renewals. This system allows citizens to book and confirm their visits online, optimizing the process by minimizing wait times and organizing applicant flow. Applicants must adhere to specific guidelines, including a dress code and necessary documentation.
DFA Appointment Processing Time
After rescheduling your DFA appointment, you should expect to receive a confirmation email with the new appointment date and relevant attachments. If you do not receive this email within 24 hours of your rescheduling request, please call (02) 8234-3488 for verification.
DFA Appointment Fees
When booking an appointment with the Department of Foreign Affairs (DFA), it’s important to understand the different fees and processing times, depending on the location of the DFA office and the type of service you choose. Here’s a detailed breakdown of the passport processing fees and expected processing times for various DFA offices:
| Location | Service Type | Fee | Processing Time |
|---|---|---|---|
| Aseana and Consular Offices (Within Metro Manila) | Regular | PHP 950 | 12 business days |
| Expedited | PHP 1,200 | 6 business days | |
| Consular Offices (Outside Metro Manila) | Regular | PHP 950 | 12 business days |
| Expedited | PHP 1,200 | 7 business days | |
| Foreign Service Posts | Standard | $60 | 28-60 days |
www.dfa.gov.ph Online: Your Official Portal
Never trust third-party sites for appointments. Always use the official DFA portal. Here’s what you’ll find there:
- FAQs and contact info
- Appointment booking for passports and apostilles
- Lists of requirements
- Payment options
DFA Appointment Renewal
For those looking to renew their passport, be sure to check out our DFA Passport Renewal Requirements & Steps page. There, we’ve outlined the entire renewal process in detail, including the necessary documents, application steps, and important guidelines to make the process smooth and hassle-free. Visit the page to get all the information you need for a successful passport renewal!
DFA Appointment for Lost Passport
If you’ve lost your passport and need a replacement, visit our DFA Lost Passport Replacement Requirements & Steps page. We’ve detailed everything you need to know, including the required documents, step-by-step application process, and important guidelines to ensure a smooth experience. Check out the page for all the essential information to get your new passport hassle-free!
DFA Appointment Date Available: How to Check
The website calendar shows available dates. If you don’t see any, try:
- Refreshing the page
- Checking other DFA offices
- Being flexible with your schedule
DFA Appointment Rescheduled
If you cannot make the scheduled date or have more important things to do, but still need your passport in a hurry, choosing the early and available slots will be a good option. You can rebook or cancel your online passport appointment quickly by following the steps below.
Visit the Official Passport Appointment System Website
If you want to reschedule your online passport appointment, go to the website where you first applied.
www.passport.gov.ph Appointment Individual: Booking for Yourself
Booking for just you? Click “Start Individual Appointment” on the DFA site. Fill in your details, pick your slot, pay, and you’re done!
DFA Appointment Online: Group Bookings
Traveling as a family? You can book up to 5 people in one group appointment. Just select “Start Group Appointment” and fill in everyone’s details.
Get Your New Philippine Passport Appointment Rescheduled
Upon changing your passport appointment, you will receive an email from the PFA titled “DFA Passport Appointment System – Notice of Provisional Schedule”. To confirm your rescheduled passport appointment, click on the link in the email.
A second email will be sent to you later entitled “DFA Passport Appointment System – Confirmation Notification from DFA”. This means you have successfully changed your passport appointment. Remember to arrive at your first passport appointment on time.
DFA Appointment Code
The DFA Appointment Code in the Philippines is a unique reference number given after booking an online passport appointment at passport.gov.ph. It’s used to access your application, confirm your schedule, and enter the DFA office. The code is shown after booking, emailed to you, and printed on your appointment form. It often looks like “PS1234567890” or similar. Keep it safe and bring it on appointment day. It confirms your slot and is required for verification.
DFA Online Appointment Available Slot
Securing an appointment for passport services through the Department of Foreign Affairs (DFA) in the Philippines requires careful attention to ensure legitimacy and efficiency. Here is a step-by-step guide to checking for available slots and setting an online appointment correctly via the DFA official website.
Access the Official DFA Website
- Start by visiting the official DFA appointment booking website at http://www.passport.gov.ph. It’s crucial to use this site as appointments cannot be booked legitimately through social media platforms or any other website. Using the official site ensures your appointment is valid and recognized by the DFA.
Select Appointment Type
- Upon accessing the site, choose the type of appointment you need, whether it’s for passport renewal or a new passport application. Click on the appropriate link to proceed.
Read the Terms and Conditions
- Before you proceed, carefully read the terms and conditions presented by the DFA. Understanding these will help ensure that you follow all required protocols and avoid any issues during the appointment process. Agree to the terms to move on to the next step.
Fill in the Appointment Form
- Enter all required information in the appointment form accurately. This includes your personal details, contact information, and any required documents you will need to have on the day of your appointment. Accuracy here is crucial to prevent any delays or problems with your application.
Choose Location and Check Available Slots
- Select the DFA office where you wish to process your passport. Once selected, the website will show you a calendar with available dates and times. Dates with available slots will typically be highlighted or marked. Choose a date and time that best suits your schedule.
Confirm Your Appointment Slot
- After selecting your preferred date and time, you will be asked to review and confirm your appointment details. Ensure everything is correct before finalizing your appointment.
Complete Any Necessary Payments
- If there are fees associated with your passport application or renewal, follow the instructions to make your payment through the authorized payment channels listed on the DFA website. Keep a copy of your payment receipt, as you may need to present it at your appointment.
Receive Confirmation and Prepare for Your Appointment
- Once your appointment is confirmed and payment is completed (if required), you will receive a confirmation email. Print this email or have it available on your mobile device, as it will serve as proof of your appointment when you arrive at the DFA office.
How to Get Appointment DFA Passport
Follow the steps above and you’ll be set. Don’t forget to double-check your documents!
How to Cancel DFA Appointment
If you need to cancel your DFA appointment for any reason, follow these steps to do so properly and verify the cancellation. This process is useful if you need to reschedule or if you are unable to attend your appointment.
Access the DFA Appointment Website
- Go to the official passport appointment system at www.passport.gov.ph.
Manage Your Existing App
- Click on the ‘Manage Existing Appointment’ tab located typically at the top or side of the homepage.
Enter Your Appointment Details
- Input your appointment code and the email address you used when booking the appointment.
Verify Your Request
- Solve the CAPTCHA challenge by selecting the “I’m not a robot” checkbox, then click on the ‘View Details’ button.
Cancel the Appointment
- Once your appointment details are displayed, click on the ‘Cancel Appointment’ button.
Confirmation of Cancellation
- After clicking ‘Cancel Appointment’, you should see a confirmation message stating, “Appointment with Appointment Code <Appointment Code> was successfully CANCELLED…”
Check Your Email
- Open your email account associated with the appointment to find the official confirmation of cancellation. This serves as your proof that the appointment has been successfully canceled.
Reschedule if Necessary
- If you need to set a new appointment, return to www.passport.gov.ph. You can start a new booking by choosing either ‘Start Individual Appointment’ or ‘Start Group Appointment’ depending on your needs.

DFA Appointment Table
| Service | Where to Book | Key Requirements | Processing Time |
|---|---|---|---|
| Passport | passport.gov.ph | Appointment, ID, payment, docs | 7-15 working days |
| Apostille | apostille.gov.ph | Appointment, docs, ID | Varies (check website) |
| Lost Passport | passport.gov.ph | Appointment, affidavit, ID | Longer than renewal |
Common Issues for DFA Appointment
Booking an appointment with the Department of Foreign Affairs (DFA) can sometimes be fraught with challenges. Understanding these common issues and learning how to navigate them can help you secure your appointment more efficiently. Here are some tips to avoid or overcome some common problems applicants face.
Overloaded Booking System
Due to the high demand for passports and other consular services, the DFA’s online appointment system can often become overloaded, especially during peak hours or when new slots are released.
Solution: Try booking your appointment during off-peak hours such as early morning or late evening. Keep checking the website periodically, especially after midnight when the system is less congested and new appointment slots are likely to be uploaded.
Limited Appointment Slots
Finding available slots can be a challenge, particularly in metropolitan regions or during busy travel seasons. Slots may be booked weeks or even months in advance.
Solution: Plan and book your appointment well ahead of time, especially if you have upcoming travel plans. Keep an eye on the DFA website for announcements regarding additional slots.
Website Downtime or Technical Issues
The DFA appointment website occasionally experiences downtime due to maintenance or technical glitches, which can prevent applicants from booking, rescheduling, or even canceling their appointments.
Solution: Refresh the browser or try accessing the site with a different device or internet connection. If problems persist, wait and try again later. It’s also helpful to clear your browser’s cache and cookies if you’re experiencing persistent issues.
Payment Problems
After choosing an appointment slot, applicants are required to pay the corresponding fee through an accredited payment center. Technical difficulties with payment processing can occur, leading to the loss of the chosen slot.
Solution: Ensure that all payment details entered are correct and that you are using a reliable internet connection. If the payment does not go through but the slot is important, try to complete the transaction using another payment method or terminal.
Documentation Errors
Errors in the application form or in the documentation brought to the appointment can lead to delays or even a requirement to reschedule.
Solution: Double-check all filled details for accuracy before submission and review the list of required documents multiple times to ensure that everything is complete and up-to-date. Follow the specific guidelines for document presentation as provided by the DFA.
Cancellation and Rescheduling Difficulties
Applicants might need to cancel or reschedule their appointments due to unforeseen circumstances. Sometimes, navigating the process online can be cumbersome.
Solution: Log into your DFA account as soon as you know your plans have changed. Use the reschedule or cancel options provided in your profile. Keep in mind there might be restrictions on how close to the appointment date you can cancel or reschedule.
No Show Policy
Failing to show up for your appointment without canceling it can prevent you from booking a new appointment for a certain period.
Solution: Always cancel your appointment officially through the DFA website if you cannot attend. This frees up the slot for other applicants and prevents penalties on your account.
DFA DFA Appointment Contact Detail
If you have any concerns regarding online appointments, please contact +632 8234 3488.
For inquiries related to passports, authentication, and other consular services, you can reach us at +632 8651 9400. Alternatively, you can contact us via mobile at +63 956 0526 290 or +63 961 9432 021.
Should you have any questions about passport requirements, please send an email to either passportconcerns@dfa.gov.ph or oca.concerns@dfa.gov.ph.
DFA appointment hotline: 0955-852-3251
Tips for a Smooth DFA Appointment
- Arrive 30 minutes early
- Dress smart (no shorts, slippers, or sleeveless)
- Bring all documents (and photocopies)
- Double-check your appointment code and details
- Keep calm—staff are there to help
Info Box: What If I Miss My Appointment?
If you miss your slot, you’ll need to rebook. Fees are non-refundable. Always set reminders and plan ahead!
FAQs About DFA Appointment
Conclusion
Navigating the DFA appointment system, crucial for passport applications, renewals, or other consular needs, can be daunting but manageable with the right guidance. This comprehensive guide has equipped you with essential tips and step-by-step instructions to efficiently book and prepare for your DFA appointment. By following these strategies, you can ensure a smooth and successful experience at the DFA office, minimizing delays and optimizing your consular service interactions.